Microwave Setup and Processing Protocol for Electron Microscopy
Total processing time: ~30 minutes - Resin Polymerization: 45-75 minutes
 |
 |
 |
|
Fixation - Resin Infiltration
Microwave Configuration A
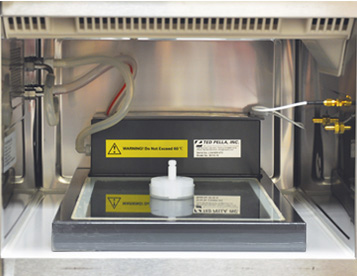
PELCO® EM Pro Vacuum Chamber
with
PELCO Prep-Eze™ Specimen Holder inside
on the PELCO ColdSpot® Pro |
Dehydration Steps
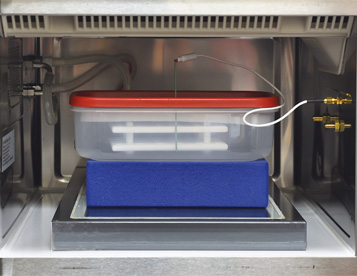
Microwave Configuration B
PELCO Prep-Eze™ Specimen Holder
on the PELCO ColdSpot® Pro |
Resin Polymerization
Microwave Configuration C
Microwave Polymerization System shown with
PELCO® Microwave Capsule Holder,
Polymerization Stand
and PELCO ColdSpot® Pro |
|
Step
|
|
Wattage
|
MW Chamber
Configuration
|
Time
|
Reagent Notes
|
Process Notes
|
|
|
Fixation
Glutaraldehyde
|
1 step
|
150W
|
A
|
1 off - 1 on - 3 off
|
Start with fixative
between 4 and 20°C |
Time in Minutes
Vacuum 20" Hg
|
|
|
Fixation
Karnovsky's or
Formaldehyde*
|
Step 1
|
150W
|
A
|
1 on - 1 off - 1 on
|
Start with fixative
between 4 and 20°C |
Time In Minutes
Wattage change
|
|
Step 2
|
650W
|
A
|
10 sec on - 20 sec off - 10 sec on
|
Time in Seconds
Vacuum 20" Hg
|
|
*NOTE: Formaldehyde containing fixatives need a two-step fixation process for fresh tissue
|
|
|
Fixation
Osmium**
|
Step 1
|
100W
|
A
|
2 on - 2 off - 2 on
-2 off - 2 on |
Start with fixative
at room temperature
|
Time in Minutes
|
|
Step 2
|
100W
|
A
|
2 on - 2 off - 2 on
x2 |
Cool fixative if T>27°C
before repeating |
Time in Minutes
|
|
**NOTE: Osmium penetration into tissue is best at low wattage
|
|
|
|
Dehydration
|
|
50% ETOH
|
Step 1
|
150W
|
B
|
40 sec
|
Start with ETOH or acetone
at room temperature
|
|
70% ETOH
|
Step 2
|
150W
|
40 sec
|
|
90% ETOH
|
Step 3
|
150W
|
40 sec
|
|
100% ETOH
|
Step 4
|
150W
|
40 sec
|
|
100% ETOH
|
Step 5
|
150W
|
40 sec
|
|
NOTE: the same steps can be used for acetone in place of ETOH
|
|
|
|
Resin Infiltration
|
|
1:1 acetone:resin
|
Step 1
|
>200W
|
A
|
3-5 min
|
Resin viscosity will determine
wattage and time
|
Vacuum 20" Hg
|
|
100% resin
|
Step 2
|
>200W
|
3-5 min
|
|
100% resin
|
Step 3
|
>200W
|
3-5 min
|
|
Spurr's & LR White 200W - Epon 250W - Araldite 300W Use longer times based on
sample and resin
|
|
|
|
Resin Polymerization
|
|
Epoxy
|
Step 1
|
150W
|
C
|
30 min
|
The first 30 minutes of
heating should not
exceed 60°C for best results
|
Elevate dish above
ColdSpot |
|
Epoxy
|
Step 2
|
450W |
45 min |
|
LR White
|
Step 1
|
150W
|
30 min
|
|
LR White
|
Step 2
|
450W |
15 min
|
|
(1) Use temperature probe to check solution temperature after the microwave step is completed.
|
|
The temperature probe will act as a microwave antenna in small fluid volumes creating
a sample temperature profile that would not exist otherwise.
|
The protocol above is based on:
Giberson, R.T., Austin, R.L., Charlesworth, J., Adamson, G., Herrera, G.A. (2003) Microwave and digital imaging technology reduce turnaround times for diagnostic electron microscopy. Ultrastruct. Pathol. 27:187-196.
Microwave-assisted tissue processing for electron microscopy is no different from conventional processing methods. The reagents used on the bench are typically used in the microwave. The number of steps in conventional processing are usually converted into microwave steps.
Microwave-assisted Fixation:
The microwave steps for fixation are programmed differently for glutaraldehyde than for fixation with formaldehyde or formaldehyde containing fixatives such as Karnovsky's (see appendix). Recent work (see below) has demonstrated the need for two different wattage settings when formaldehyde is used alone or as part of a mixed fixative.
Galvez, J.J., Giberson, R.T., Cardiff, R.D. (2006) The role of microwave radiation in reducing formaldehyde fixation times. The J. Histotechnol. 29:113-121.
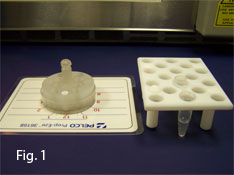
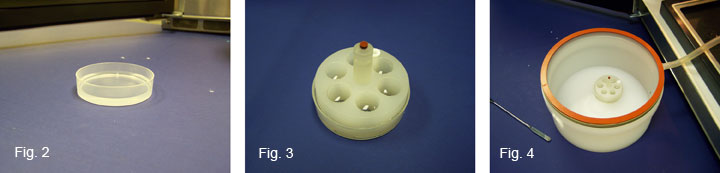
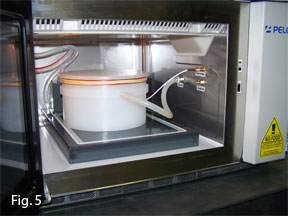
The specimen holder routinely used for microwave processing is the PELCO Prep-Eze™ Kit (36157, Fig. 1). There is also a microcentrifuge tube holder (36134, Fig. 1) supplied with the EM Kit. The Prep-Eze™ is placed in 58x15mm polypropylene petri dishes (36135) which are half- filled with reagent (Figs. 2 & 3).
 |
 |
NOTE: More than one Prep-Eze can be processed at one time.They can also be processed side-by-side with the microcentrifuge tube holder. |
| The microcentrifuge tube holder can be used for sample fixation and processing as well as the Prep-Eze. The arrow indicates the approximate level to fill the tube for processing. |
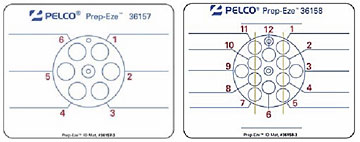
The Prep-Eze, designed for bench or microwave sample processing for electron microscopy, is available as a 6-well (#36157) and 12-well (#36158) kit. The ID Mats shown above can be written on with a Sharpie and the markings removed by wetting a towel with acetone and wiping the surface. Taped to the counter they serve as an easy-to-use method of specimen identification. |
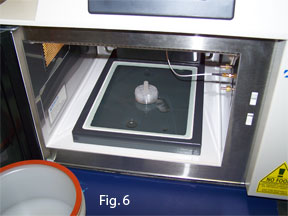
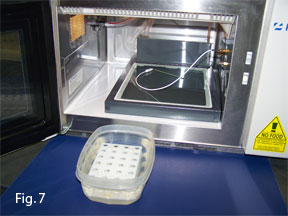
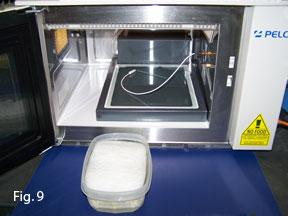
| The Prep-Eze™ is placed in the vacuum chamber for aldehyde and osmium fixation, en bloc staining and resin infiltration (Figs. 4). The vacuum chamber is then placed on the ColdSpot as shown in Figure 5.
| 
|
| The PELCO BioWave® Pro is programmed with individual protocols for fixation with glutaraldehyde, osmium, ethanol or acetone dehydration, resin infiltration and resin polymerization (epoxies) as separate protocols. There is also the complete processing protocol incorporating all steps mentioned above. Protocol steps can be edited to suit your processing requirements. Dehydration steps are done with the Prep-Eze™ on the ColdSpot as shown in Figure 6. |
 |
 |
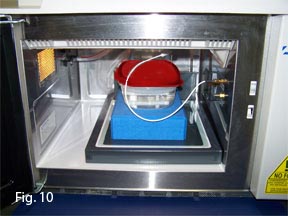
| Figures 7-10 demonstrate the setup for resin polymerization in the microwave. |
 |
 |
 |
 |
Appendix:
| 1. Fixation steps with paraformaldehyde or Karnovsky's fixative - Protocol |
| Step# |
Description |
User Prompt
(on/off) |
Time
(hr:min:sec) |
Power
(Watts) |
Temp.
(°C) |
Load Cooler
(off/auto/on) |
Vacuum/
Bubble Pump
(off/bub/
vac cycle/
vac on) |
| 1 |
Karnovsky's Fixation On |
On |
0:1:0 |
150 |
50 |
Auto |
Vacuum cycle |
| 2 |
Karnovsky's Fixation Off |
Off |
0:3:0 |
0 |
50 |
Auto |
Vacuum cycle |
| 3 |
Karnovsky's Fixation On |
Off |
0:1:0 |
150 |
50 |
Auto |
Vacuum cycle |
| 4 |
Karnovsky's Fixation Off |
Off |
0:2:0 |
0 |
50 |
Auto |
Vacuum cycle |
| 5 |
Karnovsky's Fixation On |
Off |
0:0:10 |
650 |
50 |
Auto |
Vacuum cycle |
| 6 |
Karnovsky's Fixation Off |
Off |
0:0:20 |
0 |
50 |
Auto |
Vacuum cycle |
| 7 |
Karnovsky's Fixation On |
Off |
0:0:10 |
650 |
50 |
Auto |
Vacuum cycle |
| 8 |
Buffer Rinse |
On |
0:0:40 |
150 |
50 |
Auto |
Off |
| 9 |
Buffer Rinse |
On |
0:0:40 |
150 |
50 |
Auto |
Off |
| 10 |
Osmium On |
On |
0:2:0 |
100 |
50 |
Auto |
Vacuum cycle |
| 11 |
Osmium Off |
Off |
0:2:0 |
0 |
50 |
Auto |
Vacuum cycle |
| 12 |
Osmium On |
On |
0:2:0 |
100 |
50 |
Auto |
Vacuum cycle |
| 13 |
Osmium Off |
Off |
0:2:0 |
0 |
50 |
Auto |
Vacuum cycle |
| 14 |
Osmium On |
On |
0:2:0 |
100 |
50 |
Auto |
Vacuum cycle |
| 15 |
Water Rinse |
On |
0:0:40 |
150 |
50 |
Auto |
Off |
Notes:
Vacuum Cycle = Vacuum and Vent
For Continuous Vacuum set vent time to zero
|
| 2. En bloc staining steps after osmium fixation - Protocol |
| Step# |
Description |
User Prompt
(on/off) |
Time
(hr:min:sec) |
Power
(Watts) |
Temp.
(°C) |
Load Cooler
(off/auto/on) |
Vacuum/
Bubble Pump
(off/bub/
vac cycle/
vac on) |
| 1 |
Uranyl Acetate On |
On |
0:1:0 |
100 |
50 |
Off |
Vacuum cycle |
| 2 |
Uranyl Acetate On |
Off |
0:1:0 |
0 |
50 |
Off |
Vacuum cycle |
| 3 |
Uranyl Acetate On |
Off |
0:1:0 |
100 |
50 |
Off |
Vacuum cycle |
Notes:
Vacuum Cycle = Vacuum and Vent
For Continuous Vacuum set vent time to zero |
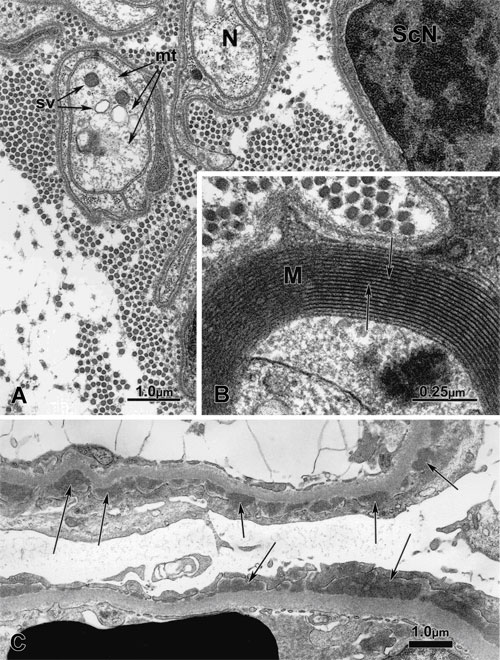 |
Fig. 1A-C. Figure 1A is a micrograph of a normal sural nerve with a non-myelinated nerve (N) having secretory
vesicles (sv), microtubules (mt) and a swan cell nucleus (ScN). The insert (1B)
shows a myelinated nerve and the
arrows clearly demonstrate its periodicity. Figure 4C is a membranouse Lupus nehpritis
(RPS/ISN Class V). There
is diffuse, generalized effacement of the foot processes of the visceral epithelial
cells. Numerous regularly
disposed epimembraneous immune complex deposits are illustrated by the arrows. Both
tissues were initially fixed
in a variant of 10% NBF (Carson et al. 1972) and then processed in the microwave
for ultrastructural evaluation by
the methods of Giberson et al. (2003) and Austin (2002). Micrographs from Ronald
L. Austin, Research Associate,
Dept. of Pathology, LSU Medical Center, Shreveport, LA 71130.
|
|
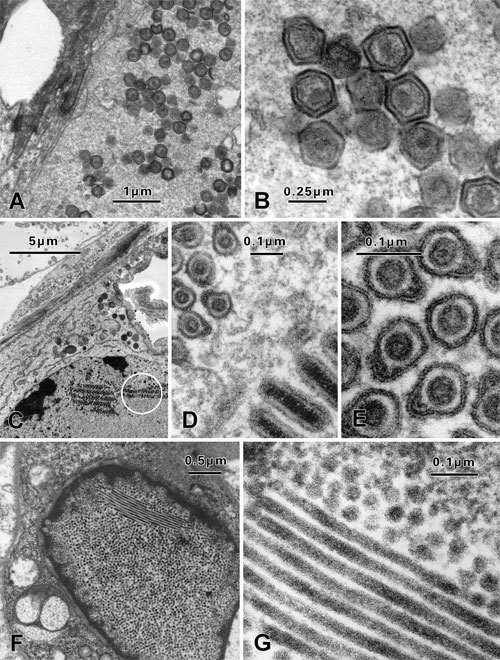
Figure 2A-G. Fig. 2A-B shows cytoplasmic iridovirus from the skin of a sturgeon. The iridovirus
is a large enveloped dsDNA virus which infects both insect and vertebrate hosts.
Fig. 2C-E demonstrates an intranuclear
baculovirus from the hepatopancreas of a crayfish from Northern California. Fig.
2C is a low magnification image of the
enveloped dsDNA virus showing the intranuclear arrangement of virus particles Fig.
2D is a higher magnification showing
both a cross-sectional and longitudinal view of the virus. Fig. 2E is a high magnification
cross-section of a number of
virus particles demonstrating the unique intranuclear membrane-bound virions. Fig. 2F-G demonstrates an endothelial cell
polyoma virus from a blood vessel in the liver of a parakeet. Polyoma virus have
a single molecule of circular dsDNA and
the particles are non-enveloped. Polyoma virions are spherical in outline and typically
45nm in diameter. Fig. 2F is a
low magnification image showing typical nuclear presentation. Fig. 2G is a high
magnification view of the virus. Infected
tissues were processed directly from 10% NBF by the microwave methods of Nordhausen
and Barr (2001) and Nordhausen et al.
(2002). Micrographs from Bob Nordhausen, Univ. of California, Davis, California
Animal Health and Food Safety Lab, School
of Veterinary Medicine, Davis, CA 95616.
|
|
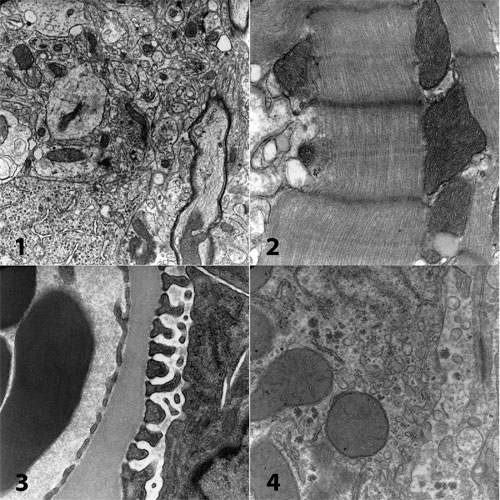
Figure 3. Micrographs from a 2008 microwave workshop held at the Center for Microscopy, San Joaquin Delta College,
Stockton, CA. Rat brain (not perfusion fixed) (1), cardiac muscle (2), kidney (3)
and liver (4) were processed from
osmium through resin polymerization for a net turnaround time of under 4 hours from
fresh tissue to the electron
microscope. Microwave techniques (Giberson, et al., 2003) make it possible to teach
and in real time demonstrate
the techniques of electron microscopy.
|