PELCO BioWave® Pro+ Microwave Tissue Processor
Electron Microscopy Tissue Processing Applicaiton Kit
Microwave Processing in a Clinical Lab
Daily Routine - Microwave Protocol
Microwave Procedure by RONALD L. AUSTIN
Dept. of Pathology, LSUHSC, Shreveport, LA.
-
Specimens processed from the day before are sectioned, stained and scoped in the morning hours. Digital images are captured.
-
Specimens already fixed in 2.5% Glutaraldehyde / 0.1 M NaCacodylate Buffer pH 7.35 arrive around 10 am by Fed-X. They are accessioned, grossed and sent to the EM lab about 10:30 or 11:00am.
-
No further aldehyde fixation is required (see note at end). At this point we begin mixing our resin (Araldite 502 / DDSA / DMP-30 by Luft). This must mix for at least 2 hours before use. We use this resin for its consistent fine grain, good stain properties and stability under the beam.
-
New specimens are logged in (given an EM number in addition to the accession number).
-
The tissue is placed in clear screw cap glass vials (Fig. 1 - 5ml or so) with 0.1M NaCacodylate buffer. This is followed by a couple of brief rinses. Tissues are left in buffer to rinse on a rotator for the length of time needed for the resin to mix (no less than two hours).
-
Mixing the resin is done under vacuum; humidity can be a problem in southern labs even with AC.
This would be a good time for lunch
-
By 1pm the resin has mixed will enough to facilitate good infiltration.
-
Remove the buffer and post fix (still in the glass screw cap vials) with 1% OsO4 in 0.1M NaCacodylate buffer. Microwave the OsO4 in the glass screw cap (caps on) to prevent osmium vapors from contaminating the microwave. Don't worry nothing will blow up. Microwave for 3 minutes at 200W. Use only enough OsO4 to cover the tissue.
-
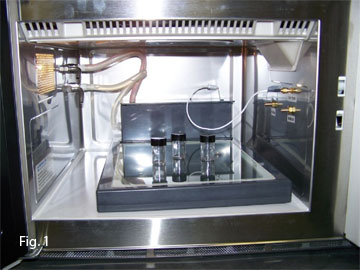
Tissues in the capped vials are processed on the ColdSpot as shown in Figure 1.
-
A brief rinse in 30% acetone and transfer tissue to the PREP-EZE specimen holder (Figure 2).
-
50% acetone for 3 minute @ 200W
-
70% acetone for 3 minute @ 200W
-
95% acetone for 3 minute @ 200W
-
2 x 100% acetone for 5 minutes @ 200W
-
1:1 100% acetone to 100% resin for 10 minute @ 250 watts - no vacuum
-
1:1 100% acetone to 100% resin under vacuum (20" Hg) for 5 minutes @ 250W
-
1:2 100% acetone to 100% resin under vacuum (20" Hg) for 5 minutes @ 250W
-
2 x 100% resin under vacuum (20" Hg) for 5 minutes @ 250W
We place the tissue in flat embedding molds (best orientation in flat molds) and leave in a 70°C oven overnight for polymerization. The resin needs to be in the oven for 14-16 or longer hours for best sectioning results.
You can stain your sections in the microwave if you are using lead citrate (LC) and uranyl acetate (UA), 3 minutes in uranium and 1 minute in lead. Set the wattage at 250.
Materials needed for UA & LC staining in the microwave
-
Reynolds 1963 lead stain (filter before use)
1N NaOH solution, carbonate-free – boil water for 10 minutes to remove CO2 and then cover and allow to cool or degas in a vacuum desiccator (can be used immediately)
-
5% UA aqueous (saturated) (filter before use)
-
Flat silicon Microwell Staining Mold (Prod. #103)
-
9 cm glass petri dish (to place mold in)
-
4 dram shell vials for rinses
-
Capped 50-100ml glass bottles for UA and LC storage.
-
Corning sterile syringe filter, 0.20µm part# 431219, for filtering UA and LC.
Method: (all staining done on the ColdSpot)
-
Place grids section side down on a filtered 35µl drop of UA in the Microwell Staining Mold
-
Microwave the UA for 3-5 minutes @ 250W.
-
Rinse in 0.22µ millipored water ~20 dips in each of two 4 dram shell vials. Blot grid on filter paper.
-
Stain with LC for 1 minute @ 250W in covered petri dish containing NaOH pellets. Rinse using 4 different vials.
-
The first vial should have 5-6 drops of 1N NaOH solution, carbonate-free, ~20 dips.
-
The next 3 vials contain 0.22µ millipored water, ~20 dips each.
-
Blot grids on filter paper.
Note:
Glutaraldehyde fixation is generally done at the site of the biopsy and the time it takes to get to your lab may be as long as 24-48 hours in glutaraldehyde, however, biopsies done locally may arrive in saline and need to be fixed ASAP. Check the contents. If saline is used place glutaraldehyde in the biopsy container and use the microwave technique to salvage what's left of the tissue.
Microscope: Hitachi 7950 III
Camera: AMT - Hamamatsu Digital Camera ORCA-HR 2k x 2k
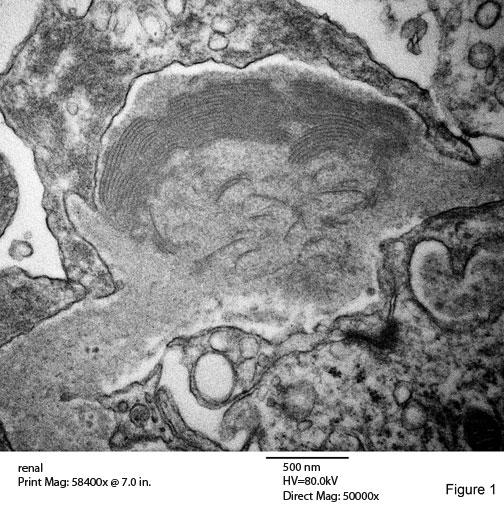
Fingerprint Structures: Figure 1
Fingerprints substructures, first described by Grishman, (142) consists of curved arrays of from two to six parallel dark bands of various lengths alternating with light bands , producing a configuration that mimics a fingerprint. The diameter of the bands varies from 10 to 15nm. These bands are usually curved but some may be straight and seemingly tubular. The composition of these fingerprints is believed to be a mix of IgA, IgG, IgM, found in the subepithelial layer of the loops. Can be found lupus nephritis WHO class III – V. A small percentage of lupus nephritis patient have fingerprints.
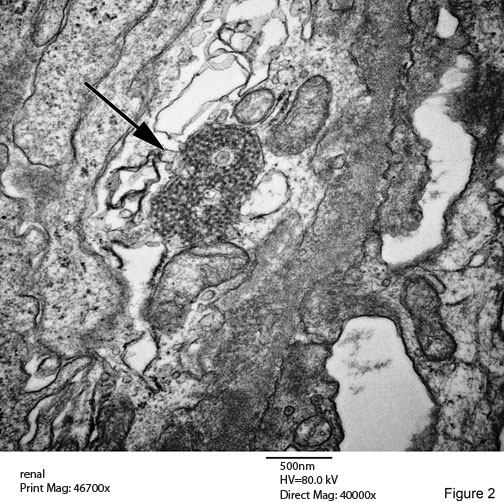
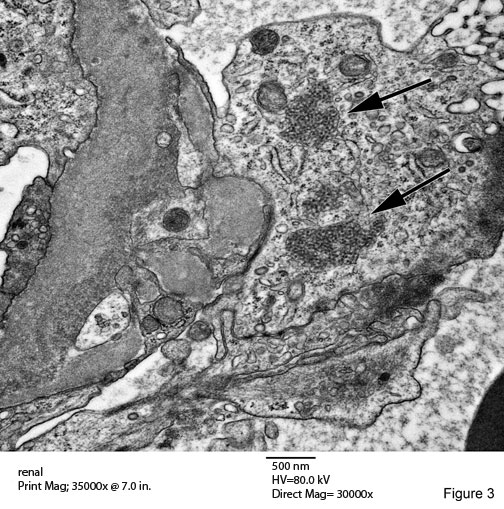
Tubuloreticular Inclusions (TRIs) Figures 2 & 3
A common and characteristic ultrastructural finding in lupus nephritis. These structures are most often identified in glomerular endothelial cells, in which they may reach large size and commonly number several per glomerulus. They are also readily detected in the endothelium of interstitial capillaries and arteries of the kidney. They are always located in dilated cisternae of endoplasmic reticulum. The precise cellular function of these structures remain unknown.
USA / Canada: Telephone: 530-243-2200; 800-237-3526; Fax 530-243-3761; Email: [email protected]
International: Telephone: 530-243-2200; Fax 530-243-3761; Email: [email protected]
Copyright © Ted Pella, Inc., 1996-2025.
All rights reserved.
All trademarks
are the property of their respective owners.